OGRECave 1.10 release

The 1.10.0 release of the OGRECave fork was just created. This means that the code is considered stable enough for general usage and the current interfaces will be supported in subsequent patch releases (i.e. 1.10.1, 1.10.2 …).

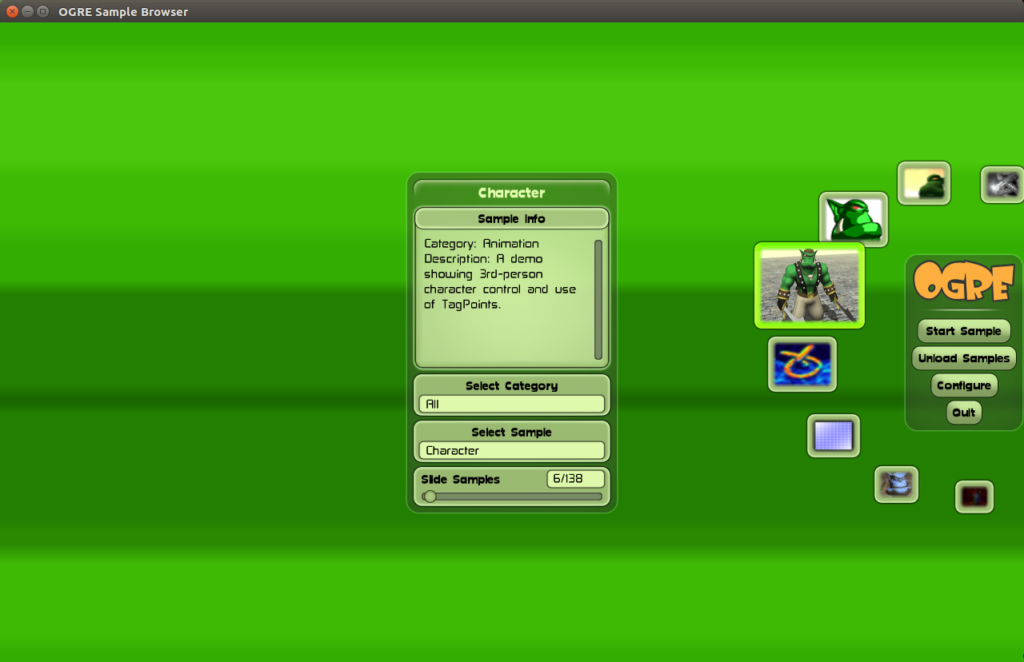
SampleBrowser running GLES2 on desktop

This release represents more than 3 years of work from various contributors when compared to the previous 1.9 release. At the time of writing it contains all commits from the bitbucket version as well as many fork specific features and fixes.

If you are reading about the fork for the first time and wonder why it was created, see this blog post. For a comparison between the github and bitbucket version see this log.

For a general overview of the 1.10 features when compared to 1.9, see the OGRECave 1.10 release notes.

The highlights probably are:

  • upstream Python bindings as an component
  • improved GL3+/ GLES2 renderers
  • A new HLMS Component implementing physically based shading
  • SDL2 based input handling
  • Bites Component for rapid prototyping of applications
  • Emscripten platform support

For further information see the github page of the fork.

Odroid U3 in the Nextcloud Box

Until now I used a microSD card for storage of my Owncloud setup. The drawback of doing so is that microSD cards only allow for so many writes until they die and go in a read-only mode.

Therefore the Nextcloud box is an attractive upgrade allowing to use a more failure proof HDD while still keeping everything inside the same housing.

The housing

The first thing to note is that the housing is much larger than one might think from the photos. See the comparison photo with the Odroid housing. Actually this should not be a surprise as the 2.5″ HDD alone is larger than the Odroid board.

Continue reading Odroid U3 in the Nextcloud Box

WordPress, AMP and Ads

Delivering your content not only as HTML, but also using the AMP-HTML subset not only reduces the loading times for your readers, but also improves the score of your site in the Google results. On top of that your site will be proxied by the Google AMP Cache, lowering your server load.

If you are using WordPress, adding AMP support is as easy as installing the AMP-Plugin which is developed by Automattic, the company behind WordPress.

Doing so will likely get you more visitors, but unfortunately there is a drawback: the plugin does not support advertisements out of the box.

So if you – like me – rely on advertisements to cover the server costs, you have to apply some tweaks to get ads on AMP pages as well. This is what this post will be about.

Extending the AMP Plugin

Basically you have to modify your current theme. If you are using an off-the shelf theme, you should create a child-theme – otherwise just extend the functions.php of your custom theme.

AMP uses the amp-ad tag for displaying ads which requires a additional script to work. Currently it also works without adding a script, but it already generates a warning. Lets be safe here and add the required script to the list:


add_action( 'amp_post_template_data', 'xyz_amp_post_template_add_ad_script' );
function xyz_amp_post_template_add_ad_script( $data ) {
	$data['amp_component_scripts']['amp-ad'] = 'https://cdn.ampproject.org/v0/amp-ad-0.1.js';
	return $data;
}

Next we create a filter that injects the actual amp-ad tags into out content:


add_action( 'pre_amp_render_post', 'xyz_amp_add_custom_actions' );
function xyz_amp_add_custom_actions() {
    add_filter( 'the_content', 'xyz_amp_add_ad' );
}

function xyz_amp_add_ad( $content ) {
    // hack for skipping featured-image
    if ( false !== strpos( $content, 'wp-post-image')) {
        // as it unfortunately uses get_post too
        // fixed in AMP 0.4.1
        return $content;
    }

    return
    '<amp-ad width=300 height=250
         type="adsense"
         data-ad-client="$YOUR_ID"
         data-ad-slot="$YOUR_TOP_SLOT">
     </amp-ad>'
    .$content.
    '<amp-ad width=300 height=250
         type="adsense"
         data-ad-client="$YOUR_ID"
         data-ad-slot="$YOUR_BOTTOM_SLOT">
     </amp-ad>';
}

The snippet above assumes you are using google adsense. If you want to integrate a different Ad Network, look here for the specific syntax.

On OGRE versions

Currently one can choose between the following OGRE versions
1.9, 1.10, 2.0 and 2.1

However the versioning scheme has become completely arbitrary while still resembling semantic versioning.
As a consequence somebody even had to put a “What version to choose?” guide on the OGRE homepage.

Unfortunately the guide confuses more than it helps:

Continue reading On OGRE versions

Creating PyGTK app snaps with snapcraft

Snap is a new packaging format introduced by Ubuntu as an successor to dpkg aka debian package. It offers sandboxing and transactional updates and thus is a competitor to the flatpak format and resembles docker images.

As with every new technology the weakest point of working with snaps is the documentation. Your best bet so far is the snappy-playpen repository.

There are also some rough edges regarding desktop integration and python interoperability, so this is what the post will be about.

I will introduce some quircks that were needed to get teatime running, which is written in Python3 and uses Unity and GTK3 via GObject introspection.

The most important thing to be aware of is that snaps are similar to containers in that each snap has its own rootfs and only restricted access outside of it. This is basically what the sandboxing is about.
However a typical desktop application needs to know quite a lot about the outside world:

  • It must know which theme the user currently uses, and after that it also needs to access the theme files.
  • For saving anything it needs access to /home
  • If it should access the internet it needs system level access as well; like querying whether there actually is an active internet connection

To declare that we want to write to home, play back sound and use unity features we use the plugs keyword like

apps:
    teatime:
         # ...
         plugs: [unity7, home, pulseaudio]

However we must also tell our app to look for the according libraries inside its snap instead of the system paths. For this one must change quite a few environment variables manually. Fortunately Ubuntu provides wrapper scripts that take care of this for us. They are called desktop-launchers.

To use the launcher the configures the GTK3 environment we have to extend the teatime part like this:

apps:
    teatime:
        command: desktop-launch $SNAP/usr/share/teatime/teatime.py
        # ...
parts:
    teatime:
         # ...
         after: [desktop/gtk3]

The desktop-launch script takes care of telling PyGTK where the GI repository files are.

You can see the full snapcraft.yml here.

Update:

Before my fix, one had to use this rather lengthy startup command

env GI_TYPELIB_PATH=$SNAP/usr/lib/girepository-1.0:$SNAP/usr/lib/x86_64-linux-gnu/girepository-1.0 desktop-launch $SNAP/usr/share/teatime/teatime.py

which hard-coded the architecture.

End Update

After this teatime will start, but the paths still have to be fixed. Inside a snap “/” still refers to the system root, so all absolute paths must be prefixed with $SNAP.

Actually I think the design of flatpak is more elegant in this regard where “/” points to the local rootfs and one does not have to change absolute paths. To bring in the system parts flatpak uses bind mounts.

Conclusions

Once you get the hang of how snaps work, packaging becomes quite straightforward, however currently there are still some drawbacks

  • the snap package results in 120MB compared to a 12KB deb. This is actually a feature as shipping all the dependencies makes the snap installable on every linux distribution. However I hope that we can get this down by introducing shared frameworks (like GTK3, Python) that do not have to be included in the app package.
  • [Update: fixed] Due to another issue, your snap has only the C locale available and thus will not be localized.
  • [Update: fixed] Unity desktop notifications do not work. You will get a DBus exception at the corresponding call.
  • [Update: fixed] The shipped .desktop file is not hooked up with the system, so you can only launch the app via the command line.
Introducing the OGRE fork on GitHub

in this post I want to introduce the OGRE fork on github. The goal of the fork is to provide a stable and reliable OGRE 1.x series while at the same time modernizing parts under the hood updates.

The idea behind this is that there are many existing 1.x codebases, actually a whole 1.x ecosystem, that can be modernized that way.
The last release of the 1.x series was over 2 years ago, so using the current 1.10 branch already gives a lot of improvements.

Continue reading Introducing the OGRE fork on GitHub

Learning Modern 3D Graphics Programming

one of the best resources to learn modern OpenGL and the one which helped me quite a lot is the Book at www.arcsynthesis.org/gltut/ – or lets better say was. Unfortunately the domain expired so the content is no longer reachable.

Luckily the Book was designed as an open source project and the code to generate the website is still available at Bitbucket. Unfortunately this repository does not seem to be actively maintained any more.

Therefore I set out to make the Book to be available again using Github Pages. You can find the results here:

https://paroj.github.io/gltut/

However I did not simply mirror the pages, but also improved it at several places. So what has changed so far?

Continue reading Learning Modern 3D Graphics Programming

meCoffee PID controller Review for the Rancilio Silvia

The Rancilio Silvia Espresso Machine has one major weakness: the high fluctuation of the default thermostat.
The taste of the espresso already varies with temperature deviations as small as 1°C, but the thermostat of the Silvia V3, V4 has a range of ~20°C (~30°C for Silvia V1, V2).

a thermostat having a hard time keeping the target temperature of 110°C

So to get a decent tasting espresso one need to predict the heating phase of the boiler, which is called temperature surfing. However this involves wasting water and one also needs the right timing which is especially difficult for beginners.

PID Controlled Temperature

A better solution to is to replace the default thermostat with a digital one. This means adding microcontroller that will monitor the temperature using the PID algorithm. This way you always have the right temperature – without surfing. Furthermore the microcontroller can be used to add some fancy features to the machine like preinfusion or a shot timer.

Continue reading meCoffee PID controller Review for the Rancilio Silvia

Rust prevention on Rancilio Silvia

The main point one can criticise about the build of the Rancilio Silvia is that it is not all stainless steel. While many important parts like the drip tray and the cup holder are, the main frame (black) is just powder coated steel. This means it can rust and according to reports on the internet it actually does.
However one can do some small and cheap modifications to drastically reduce the risk.

Rust is the product of the reaction of steel and oxygen in the presence of water, so to prevent rust one either has to remove oxygen or water.
The powder coating of the frame typically removes both, but over time scratches penetrate the coating and the frame can rust.

Prevent Scratches

The first step to prevent rust is therefore to prevent scratches on the steel frame. To this end one can add small rubber knobs (8mm diameter) at places where movable parts come in contact with the frame

Prevent Water Splashes

The other thing one can do is to ensure that less water come in contact with the frame. Unfortunately the drain on the Silvia is quite short, so water splashes in all directions and can run behind the drip tray – especially if it is not moved all the way back. See the following video:

An easy fix to improve the situation is to extend the drain with a silicon pipe (19mm inner diameter) for about 4cm. After the modification, the water hardly splashes any more. (again this is the worst-case scenario with the drip tray all the way in the front)

Header Image CC-sa-by Darkone

Changing the Fan on the Corsair CS550M

While the Corasair CS550M is a good power supply unit (PSU), the fan or more specifically the fan bearing is quite poor. Even though the fan is temperature controlled, this results in a annoying clickering noise. Therefore one might want to replace it with a better quality, more quite fan.

In order to do so, you will need the following tools:

  • soldering iron
  • shrink-on tube
  • diagonal cutter
  • flat nose pliers
  • convenience: cable stripper

However note that the used high power capacitors store enough charge to shock you even several minutes after disconnecting the PSU. So you should wait for about 10minutes after disconnecting the PSU and even then watch out not to touch the pins of the capacitors.

If you set-up everything correctly, follow these steps to silence your corsair:

now you can re-asseble the PSU housing and optionally attach the tacho cable to a free plug on your mainboard to monitor the PSU fan.

This post was inspired by this youtube video. The pc fan connector diagram was made by pavouk.org.

Exit mobile version
%%footer%%