Do not use Meson

Recently the Meson Build System gained some momentum. It is time to stop that.
Not that Meson is a bad piece of software – on the contrary, it is quite well designed.
Still it makes building C/C++ applications worse, by (quoting xkcd) basically creating this:

It sets out to create a cross-platform, more readable and faster alternative to autotools. But there is already CMake that solves this.

You might say that CMake is ugly, but note that the CMake 2.x you might have tried is not the same CMake 3.x that is available today. Many patterns have improved and are now both more logical and more readable.

Nowadays the difference between Meson and CMake is just a matter of syntactic preference. The Meson authors seem to agree here.

The actual criterion for selecting a build system however should be tooling support and community spread. CMake easily wins here:

After the introduction of the server mode it got native support by QtCreator, CLion, Android Studio (NDK) and even Microsofts Visual Studio. Native means that you do not have to generate any intermediate project files, but the CMakeLists.txt is used directly by the IDE.

On the community spread side we got e.g. KDE, OpenCV, zlib, libpng, freetype and as of recently Boost. These projects using CMake not only guarantees that you can easily use them, but that you can also include them in your build via add_subdirectory such that they become part of your project. This is especially useful if you are cross-compiling – for instance to a Raspberry Pi.

On the other hand, reinventing a wheel that is tailored to the needs of a specific community (Gnome), means that it will fall behind and eventually die. This is what is currently happening to the Vala language that had a similar birth to Meson.

The meson devs might object that Meson generates build files that run faster on a Raspberry Pi. However if your cross compiling is working you do not need that. And honestly, that particular improvement could have been also achieved by providing a patch to the CMake Ninja generator..

Addendum 27-11-2018
Stumbled over another great guide to modern CMake.

Addendum 15-06-2018
A new guide for CMake called CGold can be found here, which is of comparable quality to the Meson docs.

Addendum 4-1-2018
Some comments (rightfully) note that Meson has generally a better documentation and avoids some of its pitfalls. However this is mostly due to Meson not being around long enough such that the way you do things in Meson changed. Neither did it see such a widespread use like CMake yet. (think of corner-cases)

But even if you argue that this is precisely the point why you should use Meson, I would argue that improving the existing documentation in CMake and adding more educational warnings is easier then writing something from scratch.

Addendum 29-02-2019
Part of the perceived superiority of Meson, was that it just was not in use for long enough to notice its flaws – contrary to long lasting legacy of CMake.
With its adaptation, things like only one global namespace start to get attention – things that are already solved in CMake..
Migrating from owncloud 9.1 to nextcloud 11

First one should ask though: why? My main motivation was that many of the apps I use were easily available in the nextcloud store, while with owncloud I had to manually pull them from github.
Additionally some of the app authors migrated to nextcloud and did not provide further updates for owncloud.

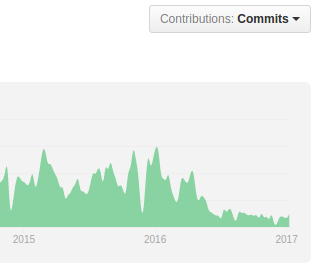
Another reason is this:

the graphs above show the number of commits for owncloud and nextcloud. Owncloud has taken a very noticeable hit here after the fork – even though they deny it.

From the user perspective the lack of contribution is visible for instance in the admin interface where with nextcloud you get a nice log browser and system stats while with owncloud you do not. Furthermore the nextcloud android app handles Auto-Upload much better and generally seems more polished – I think one can expect nextcloud to advance faster in general.

Migrating

For migrating you can follow the excellent instructions of Jos Poortvliet.

In my case owncloud 9.1 was installed on Ubuntu in /var/www/owncloud and I put nextcloud 11 to /var/www/nextcloud. Then the following steps had to be applied:

  1. put owncloud in maintenance mode
    sudo -u www-data php occ maintenance:mode --on
  2. copy over the config.php
    cp /var/www/owncloud/config/config.php /var/www/nextcloud/config/
  3. adapt the path in config.php
    # from 
    'path' => '/var/www/owncloud/apps',
    # to
    'path' => '/var/www/nextcloud/apps',
  4. adapt the path in crontab
    sudo crontab -u www-data -e
  5. adapt the paths in the apache config
  6. run the upgrade script which takes care of the actual migration. Then disable the maintanance mode.
    sudo -u www-data php occ upgrade
    sudo -u www-data php occ maintenance:mode --off

and thats it.

OGRECave 1.10 release

The 1.10.0 release of the OGRECave fork was just created. This means that the code is considered stable enough for general usage and the current interfaces will be supported in subsequent patch releases (i.e. 1.10.1, 1.10.2 …).

SampleBrowser running GLES2 on desktop

This release represents more than 3 years of work from various contributors when compared to the previous 1.9 release. At the time of writing it contains all commits from the bitbucket version as well as many fork specific features and fixes.

If you are reading about the fork for the first time and wonder why it was created, see this blog post. For a comparison between the github and bitbucket version see this log.

For a general overview of the 1.10 features when compared to 1.9, see the OGRECave 1.10 release notes.

The highlights probably are:

  • upstream Python bindings as an component
  • improved GL3+/ GLES2 renderers
  • A new HLMS Component implementing physically based shading
  • SDL2 based input handling
  • Bites Component for rapid prototyping of applications
  • Emscripten platform support

For further information see the github page of the fork.

On OGRE versions

Currently one can choose between the following OGRE versions
1.9, 1.10, 2.0 and 2.1

However the versioning scheme has become completely arbitrary while still resembling semantic versioning.
As a consequence somebody even had to put a “What version to choose?” guide on the OGRE homepage.

Unfortunately the guide confuses more than it helps:

Continue reading On OGRE versions

Creating PyGTK app snaps with snapcraft

Snap is a new packaging format introduced by Ubuntu as an successor to dpkg aka debian package. It offers sandboxing and transactional updates and thus is a competitor to the flatpak format and resembles docker images.

As with every new technology the weakest point of working with snaps is the documentation. Your best bet so far is the snappy-playpen repository.

There are also some rough edges regarding desktop integration and python interoperability, so this is what the post will be about.

I will introduce some quircks that were needed to get teatime running, which is written in Python3 and uses Unity and GTK3 via GObject introspection.

The most important thing to be aware of is that snaps are similar to containers in that each snap has its own rootfs and only restricted access outside of it. This is basically what the sandboxing is about.
However a typical desktop application needs to know quite a lot about the outside world:

  • It must know which theme the user currently uses, and after that it also needs to access the theme files.
  • For saving anything it needs access to /home
  • If it should access the internet it needs system level access as well; like querying whether there actually is an active internet connection

To declare that we want to write to home, play back sound and use unity features we use the plugs keyword like

apps:
    teatime:
         # ...
         plugs: [unity7, home, pulseaudio]

However we must also tell our app to look for the according libraries inside its snap instead of the system paths. For this one must change quite a few environment variables manually. Fortunately Ubuntu provides wrapper scripts that take care of this for us. They are called desktop-launchers.

To use the launcher the configures the GTK3 environment we have to extend the teatime part like this:

apps:
    teatime:
        command: desktop-launch $SNAP/usr/share/teatime/teatime.py
        # ...
parts:
    teatime:
         # ...
         after: [desktop/gtk3]

The desktop-launch script takes care of telling PyGTK where the GI repository files are.

You can see the full snapcraft.yml here.

Update:

Before my fix, one had to use this rather lengthy startup command

env GI_TYPELIB_PATH=$SNAP/usr/lib/girepository-1.0:$SNAP/usr/lib/x86_64-linux-gnu/girepository-1.0 desktop-launch $SNAP/usr/share/teatime/teatime.py

which hard-coded the architecture.

End Update

After this teatime will start, but the paths still have to be fixed. Inside a snap “/” still refers to the system root, so all absolute paths must be prefixed with $SNAP.

Actually I think the design of flatpak is more elegant in this regard where “/” points to the local rootfs and one does not have to change absolute paths. To bring in the system parts flatpak uses bind mounts.

Conclusions

Once you get the hang of how snaps work, packaging becomes quite straightforward, however currently there are still some drawbacks

  • the snap package results in 120MB compared to a 12KB deb. This is actually a feature as shipping all the dependencies makes the snap installable on every linux distribution. However I hope that we can get this down by introducing shared frameworks (like GTK3, Python) that do not have to be included in the app package.
  • [Update: fixed] Due to another issue, your snap has only the C locale available and thus will not be localized.
  • [Update: fixed] Unity desktop notifications do not work. You will get a DBus exception at the corresponding call.
  • [Update: fixed] The shipped .desktop file is not hooked up with the system, so you can only launch the app via the command line.

Introducing the OGRE fork on GitHub

in this post I want to introduce the OGRE fork on github. The goal of the fork is to provide a stable and reliable OGRE 1.x series while at the same time modernizing parts under the hood updates.

The idea behind this is that there are many existing 1.x codebases, actually a whole 1.x ecosystem, that can be modernized that way.
The last release of the 1.x series was over 2 years ago, so using the current 1.10 branch already gives a lot of improvements.

Continue reading Introducing the OGRE fork on GitHub

Learning Modern 3D Graphics Programming

one of the best resources to learn modern OpenGL and the one which helped me quite a lot is the Book at www.arcsynthesis.org/gltut/ – or lets better say was. Unfortunately the domain expired so the content is no longer reachable.

Luckily the Book was designed as an open source project and the code to generate the website is still available at Bitbucket. Unfortunately this repository does not seem to be actively maintained any more.

Therefore I set out to make the Book to be available again using Github Pages. You can find the results here:

https://paroj.github.io/gltut/

However I did not simply mirror the pages, but also improved it at several places. So what has changed so far?

Continue reading Learning Modern 3D Graphics Programming

Converting a Ubuntu and Windows dual-boot installation to UEFI

UEFI is the successor to BIOS for communicating with the Firmware on your Mainboard.
While the first BIOS was released with the IBM-PC in 1981, the first UEFI version (EFI 2.0) was released 25 years later in 2006 building upon the lessons learned in that timespan. So UEFI is without any doubt the more modern solution.

The user-visible advantages of using UEFI instead of BIOS are

You could reinstall both Windows and Ubuntu to get UEFI. However it is also possible to convert existing installations of both on the fly – without the backup/ restore cycle. You should still do a backup in case something goes wrong though.

Prerequisites

Only the 64bit Versions of Windows support UEFI. Therefore this guide assumes that you run the 64bit versions of both Windows and Ubuntu.

Furthermore verify the following items before you continue – otherwise you will not be able to finish the conversion. Use GParted in case you have not enough space before the first or after the last partition.

  • 250MB space in front of first partition
    Typically Windows 8 creates a 350MB System Partition upon installation. This space can be reclaimed for a 100MB EFI partiton and a new 100MB Windows System partition.
  • 1-2MB behind last partiton (for the GPT backup)
  • UEFI bootable Ubuntu USB drive.
    You can use the startup disk creator on ubuntu with an Ubuntu 14.04+ ISO.
  • UEFI bootable Windows USB drive.
    You can use the Microsoft Media Creation tool for Windows 10 to get one.

to test that the sticks are indeed UEFI compatible, try booting them with CSM Mode disabled in your BIOS.

Convert the drive to GPT

UEFI requires a GUID Partition Table (GPT), so first we need to convert from MBR to GPT.

After this step you will not be able to boot your system any more. So make sure you have the Ubuntu USB drive ready.

We will use gdisk to perform the conversion as following:

sudo gdisk /dev/sdX
Command (? for help): w

where sdX is your system drive (e.g. sda)

Convert Windows to UEFI

Now boot your Windows USB drive and enter the command prompt as described in this Microsoft Technet article at step 6.

Continue with the following steps from the Article. Note that we have skipped steps 1-4 as we used Ubuntu to convert the disk to GPT.

We have now created a EFI partition, a new EFI compatible Windows System Partition and we have installed the Windows Bootloader to the EFI partition. Your Windows installation should now start again.
At this point you could also perform an upgrade to Windows 10, as the upgrade would erase grub from the EFI partition anyway.

Next we are going to install grub to the EFI partition and make it manage the boot.

Enter a Ubuntu chroot

As we can not directly boot our Ubuntu installation, we will instead boot from the Ubuntu USB drive and the switch to the installed Ubuntu.
To do the switch we have to setup and enter a chroot as following

sudo mount /dev/sdXY /mnt 
sudo mount /dev/sdX1 /mnt/boot/efi 
sudo mount -o bind /dev /mnt/dev
sudo mount -o bind /sys /mnt/sys
sudo mount -t proc /proc /mnt/proc
sudo cp /proc/mounts /mnt/etc/mtab
sudo cp /etc/resolv.conf /mnt/etc/resolv.conf
sudo chroot /mnt

where sdXY is the partition where your Ubuntu system is installed (e.g. sda5)

Convert Ubuntu to UEFI

Inside your Ubuntu Installation we have to replace grub for BIOS (aka grub-pc) with grub for UEFI (aka grub-efi) as:

sudo apt-get --reinstall install grub-common grub-efi-amd64 os-prober

this would be enough to get the system booting again, however we also aim for secure boot so we also need to install the following:

sudo apt-get install shim-signed grub-efi-amd64-signed linux-signed-generic

This installs signatures for grub and the kernel which are used to verify the integrity of these at boot. Furthermore we install shim, which is a passthrough bootloader that translates from the Microsoft signatures on you mainboard to the signatures by Canonical used to sign grub and the kernel (see this for details).

Next we finally install grub to the EFI partition by:

sudo grub-install --uefi-secure-boot /dev/sdX
sudo update-grub

where sdX is again your system drive (e.g. sda).

Now you can enable secure boot in your BIOS and benefit. Note that some BIOS implementations additionaly require you to select the trusted signatures. Look out for an option called “Install Default Secure Boot keys” or similar to select the Microsoft signatures.

Updating Crucial MX100 Firmware with Ubuntu

There has been a Firmware update for the Crucial MX100 to MU02. In case you are running Ubuntu there is an easy way to perform the update without using a CD or USB Stick.

As the firmware comes in form of an iso image containing Tiny Core Linux, we can instruct grub2 to directly boot from it. Here is how:

  1. append the following to /etc/grub.d/40_custom:
    menuentry "MX100 FW Update" {
     set isofile="/home/<USERNAME>/Downloads/MX100_MU02_BOOTABLE_ALL_CAP.iso"
     # assuming your home is on /dev/sda3 ATTENTION: change this so it matches your setup
     loopback loop (hd0,msdos3)$isofile
     linux (loop)/boot/vmlinuz libata.allow_tpm=1 quiet base loglevel=3 waitusb=10 superuser rssd-fw-update rssd-fwdir=/opt/firmware rssd-model=MX100
     initrd (loop)/boot/core.gz
    }

    read this for details of the file format.

  2. run sudo update-grub
  3. reboot and select “MX100 FW Update”
  4. Now you can delete the menuentry created in step1

Note that this actually much “cleaner” than using windows where you have to download 150MB of the Crucial Store Executive Software which actually is a local webserver written in Java (urgh!). But all it can do is display some SMART monitoring information and automatically perform the above steps on windows.

Header Image CC-by MiNe

OpenGL Matrices – the missing bits

While generally the available documentation on how the OpenGL matrices work is quite good, there are some missing bits. Although not necessary for your everyday rendering, they give one some insight on how rasterization in general and OpenGL in special works.

W coordinate after perspective divide

After conversion to normalized device coordinates(ndc) by applying a matrix like

\begin{bmatrix}A & 0 & B & 0\\ 0 & C & D & 0\\ 0 & 0 & E & F\\ 0& 0 & -1 & 0\end{bmatrix} \begin{pmatrix} x \\ y \\ z \\ w \end{pmatrix}

one might think that projection is applied on each vertex looks like

\vec{v}_{ndc} = \frac{1}{w} \begin{pmatrix} x \\ y \\ z \\ w \end{pmatrix} = \begin{pmatrix} \tfrac{x}{w} \\ \tfrac{y}{w} \\ \tfrac{z}{w} \\ 1 \end{pmatrix}

however it actually looks like

\vec{v}_{ndc} = \begin{pmatrix} \tfrac{x}{w} \\ \tfrac{y}{w} \\ \tfrac{z}{w} \\ \tfrac{1}{w} \end{pmatrix}

the w coordinate is not divided by itself, but is inverted instead. This is done because the interpolation between vertices still needs to take place and for perspective correct interpolation one needs the camera space depth z = -w_{cam}.

\begin{aligned} \vec{v}_{\alpha} &= \frac{(1-\alpha) \tfrac{\vec{v}_0}{-z_0} + \alpha \tfrac{\vec{v}_1}{-z_1}}{(1 - \alpha)\tfrac{1}{-z_0} + \alpha \tfrac{1}{-z_1}} \\[1.5em] &= \frac{(1-\alpha)\vec{v}_0 w_{0_{ndc}} + \alpha\vec{v}_1 w_{1_{ndc}}}{(1-\alpha) w_{0_{ndc}} + \alpha w_{1_{ndc}}} \end{aligned}

instead of dividing by -z we can multiply with w_{ndc} as multiplication is faster than division.

Note that for brevity the given formula assumes a scanline based rasterizer as it interpolates only between two vertices. The general approach is to use barycentric coordinates to interpolate between all three vertices simultaneously.

Row major or column major

Even though even Wikipedia says OpenGL is column major, it is actually storage agnostic. However by default it interprets your 16 element array as:

\begin{bmatrix}m_0 & m_4 & m_8 & m_{12}\\ m_1 & m_5& m_9 & m_{13}\\ m_2 & m_6 & m_{10} & m_{14}\\ m_3 & m_7 & m_{11} & m_{15}\end{bmatrix}

Yet most OpenGL functions dealing with matrices offer a transpose parameter which you can use to specify the used order. For a comparison of storage orders see the Eigen documentation.

Notably however, GLSL matrices do neither follow C nor mathematical notation; the mat2x4 M type has 2 columns and 4 rows and thus M \in \mathbb{R}^{4 \times 2} mathematically.
Consequently though – albeit breaking with the C notation – M[0] will return the first column (vec4).

Now, if you use the transpose parameter mentioned before, prepare to think hard about the data you are actually getting in the Shader.

Exit mobile version
%%footer%%